Posted on

DIY picture tile.

This is my favorite craft to do. I have done 7 of these! It is soooo cheap and it only costs $1.78.  This is what I give as a wedding gift, because I am always on a budget! This is a gift that everyone will love, and you can tweak it in so many other ways as well! πŸ™‚ You can pretty much put any thing on the tile and it will always be a cute decoration.
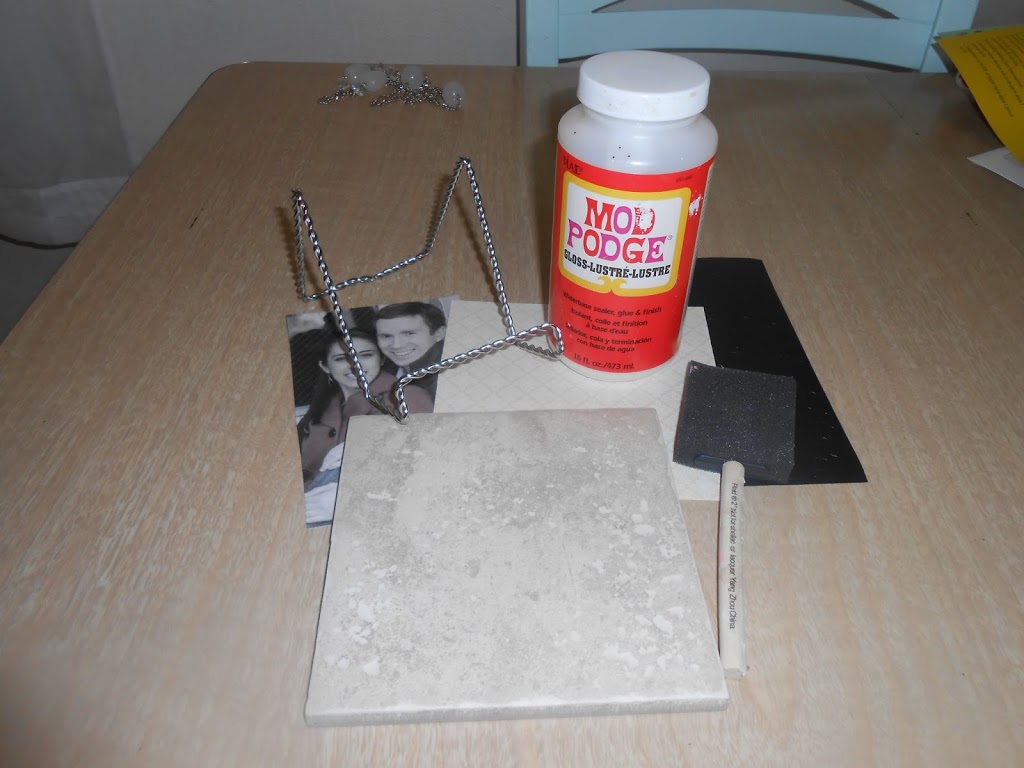
Supplies:
Modge podge
Sponge paint brush
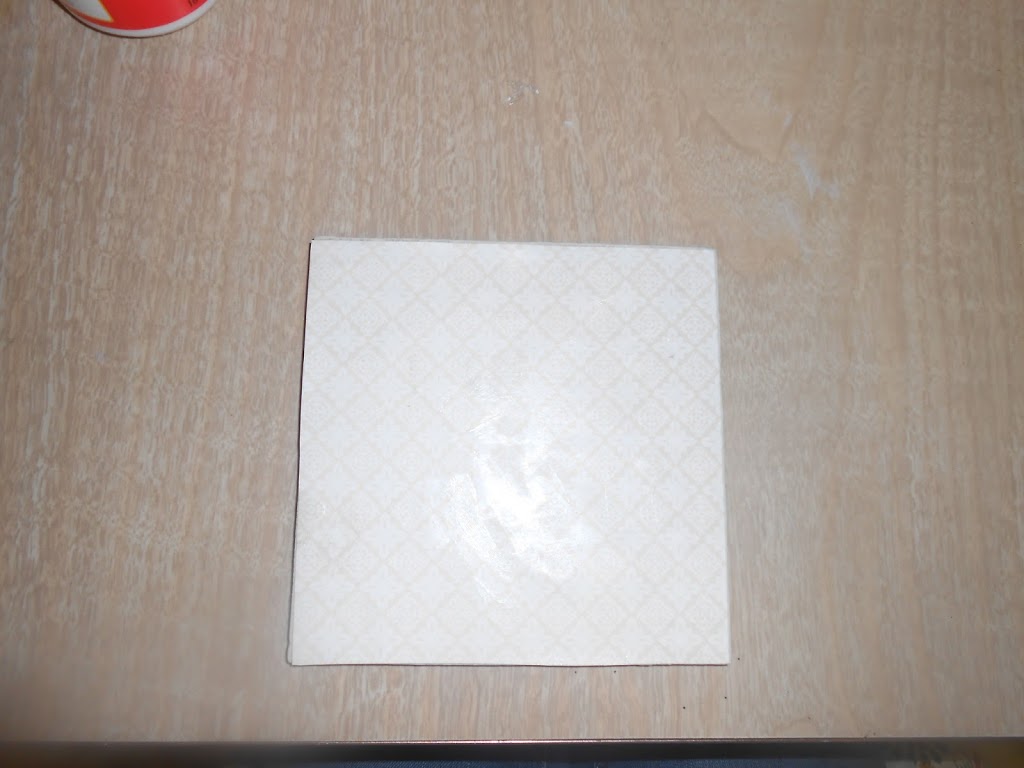
Small tile- I got mine at Lowe’s for 78 cents
Scrapbook paper
Picture-I have done an actual photo that was printed at Costco, paper, and card stock. I think card stock has turned out the best for me. That way you don’t have to print a picture off at the store and you can just print at home from your computer and save money!
Instructions: 
  1. Take your tile and use it to cut out a piece of scrap book paper that fits on the tile, then modge podge the paper onto the tile. I put it on the back first, then I go over on the top to give it a glossy look. 
      2. 
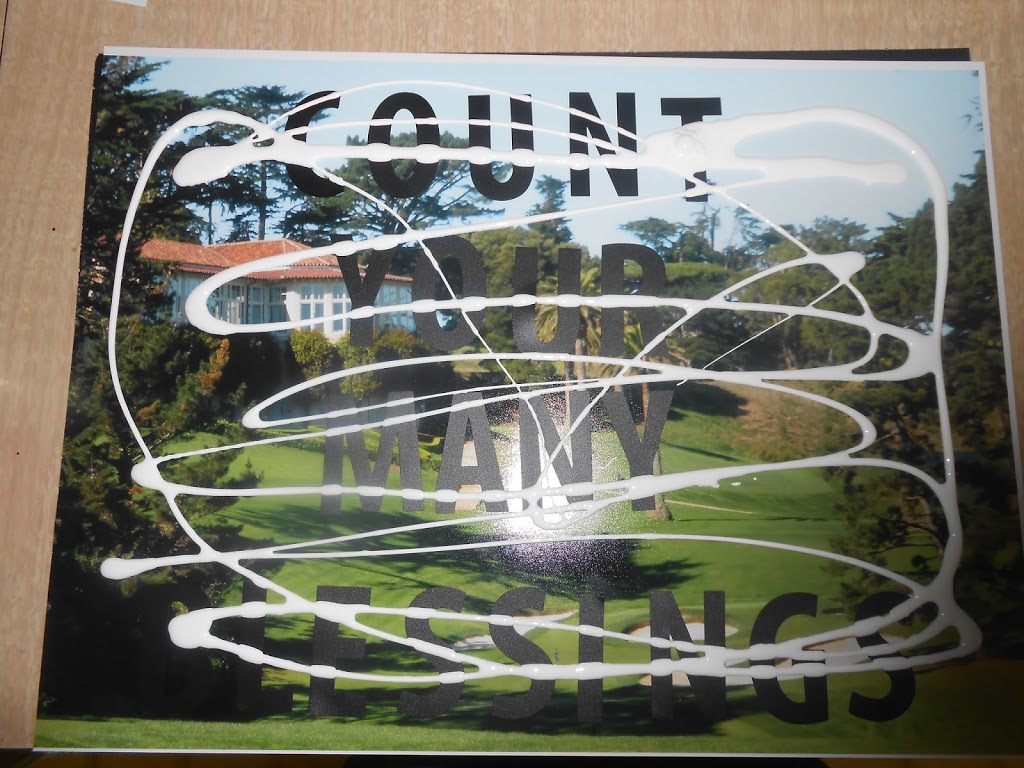
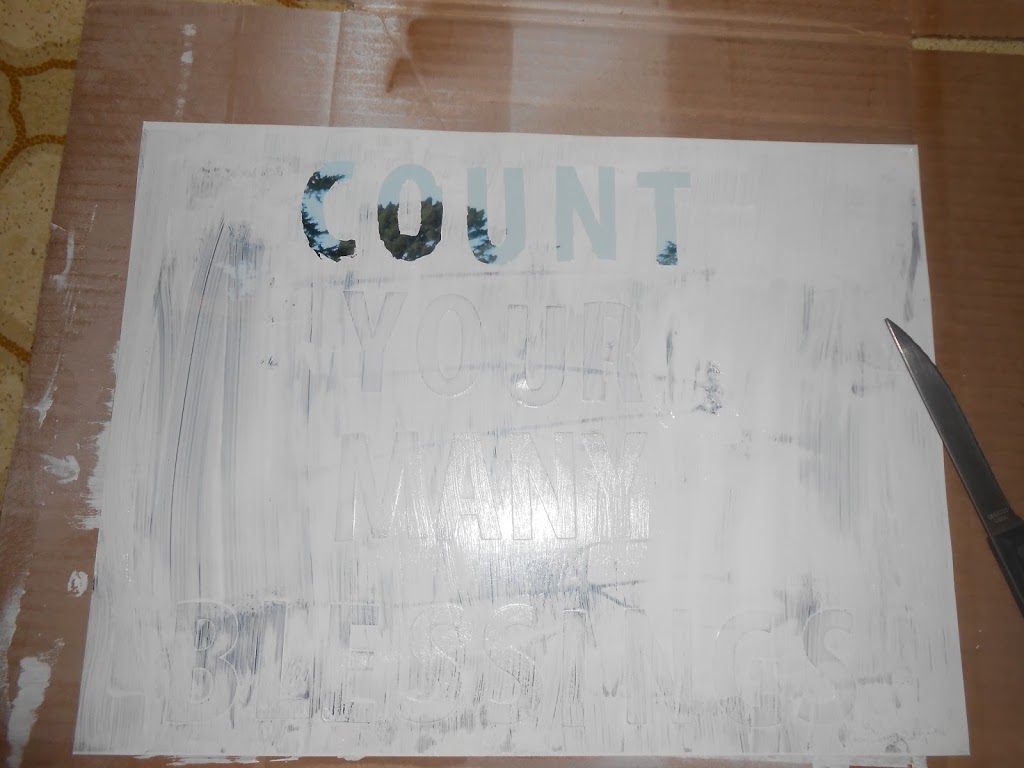
Take your picture and cut it out. When I print it on my computer I tell it to print a 4×6 picture.                You’ll want to make the picture smaller then the tile. You can make it however small or big you want it, but I suggest you leave at least an inch of scrap book paper showing, because the scrap book paper is what makes this craft cute! Modge Podge the picture on and do another coat on top of the picture, to give it a glossy look. It will be white at first but when it dries, it is glossy! 
Make sure you don’t touch it when it’s drying. And make sure you get all the air bubbles out.
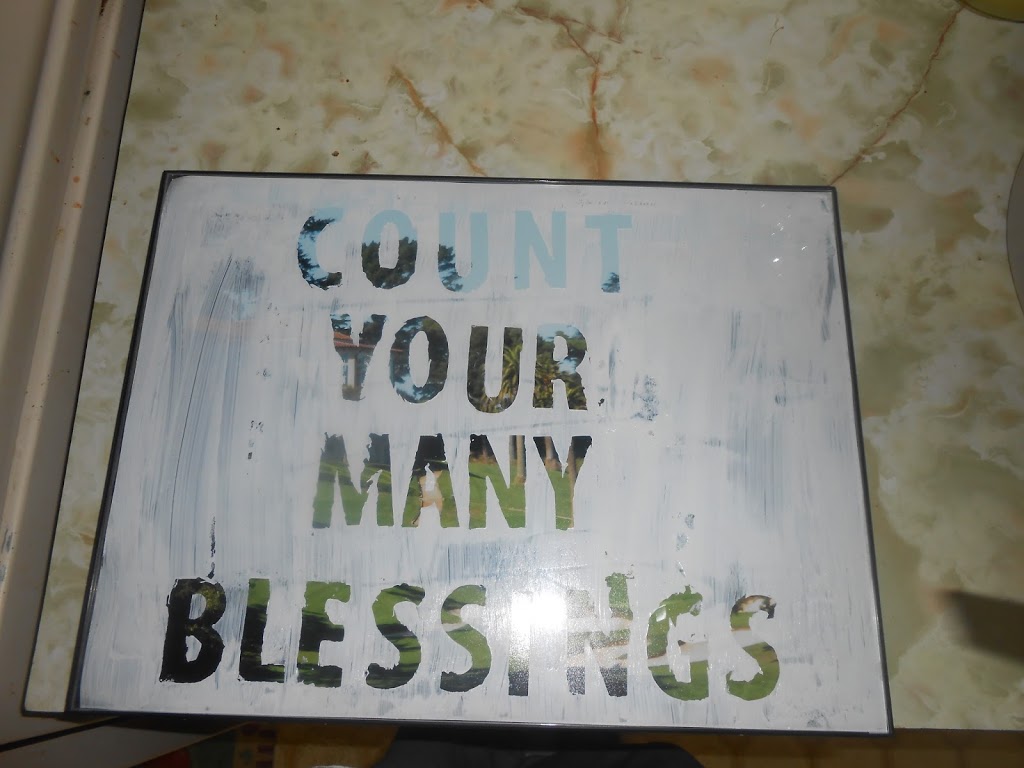
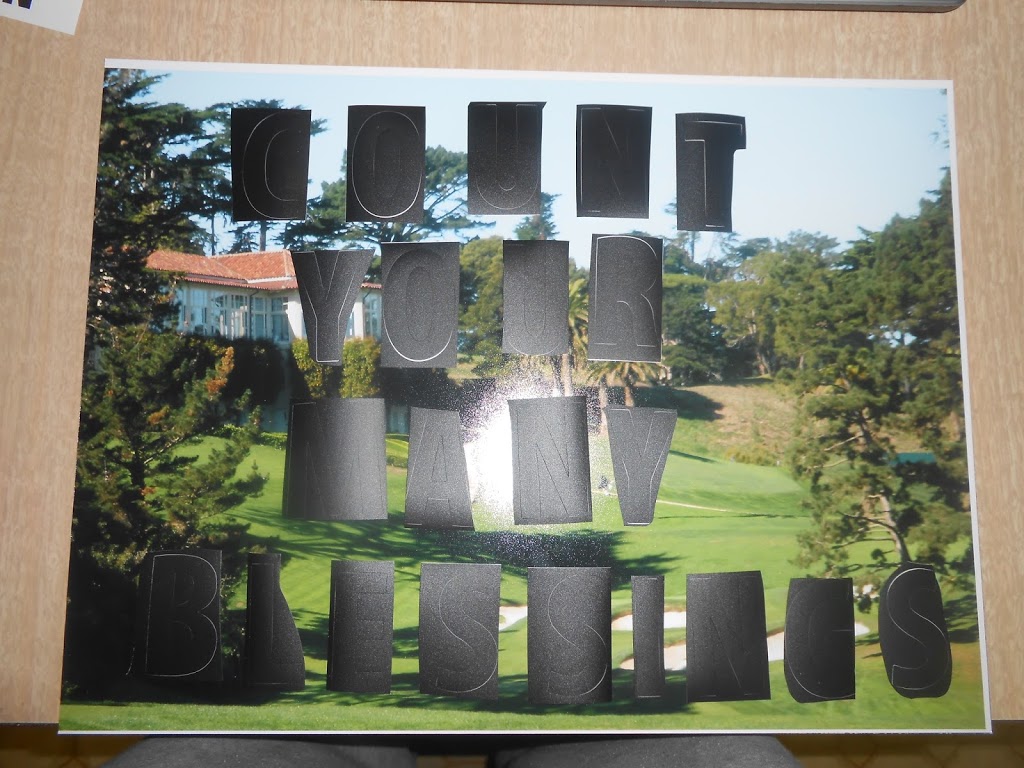
    3. If you want you can put letters on the picture. This was the first time I did this and I really liked it actually. It is cute either way! Now just wait for it to dry and you’re done! It takes less then 10 minutes and it such a cute gift!
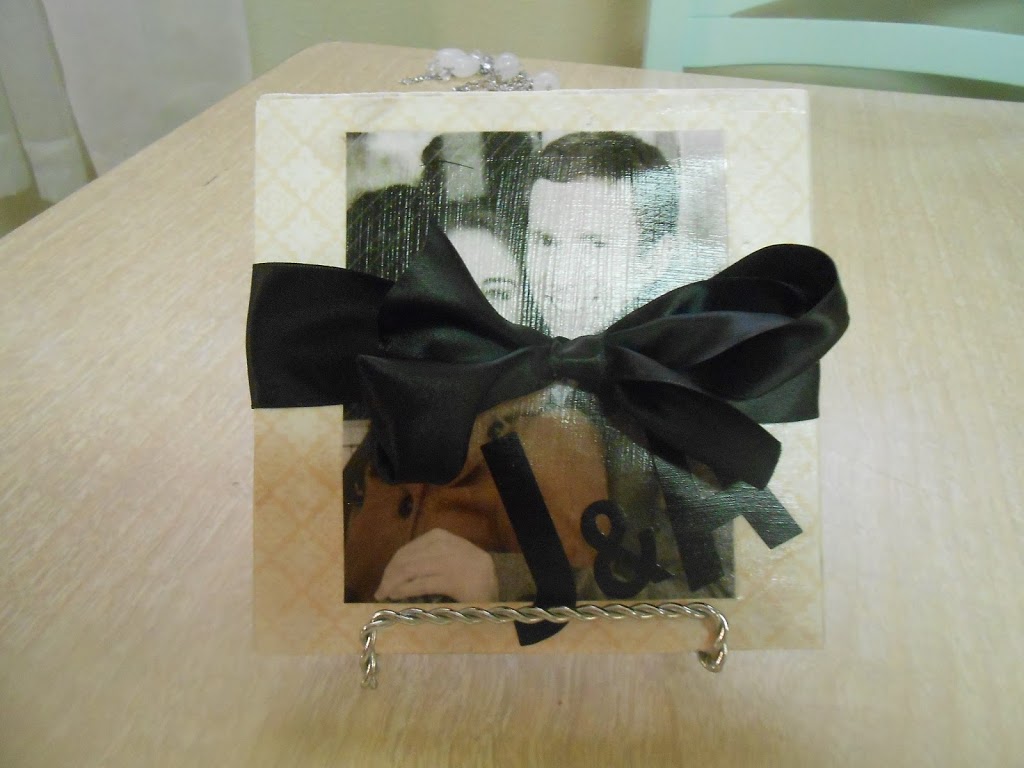
Put it on a dollar store easel and it’s a beautiful homemade cherished gift! πŸ™‚  
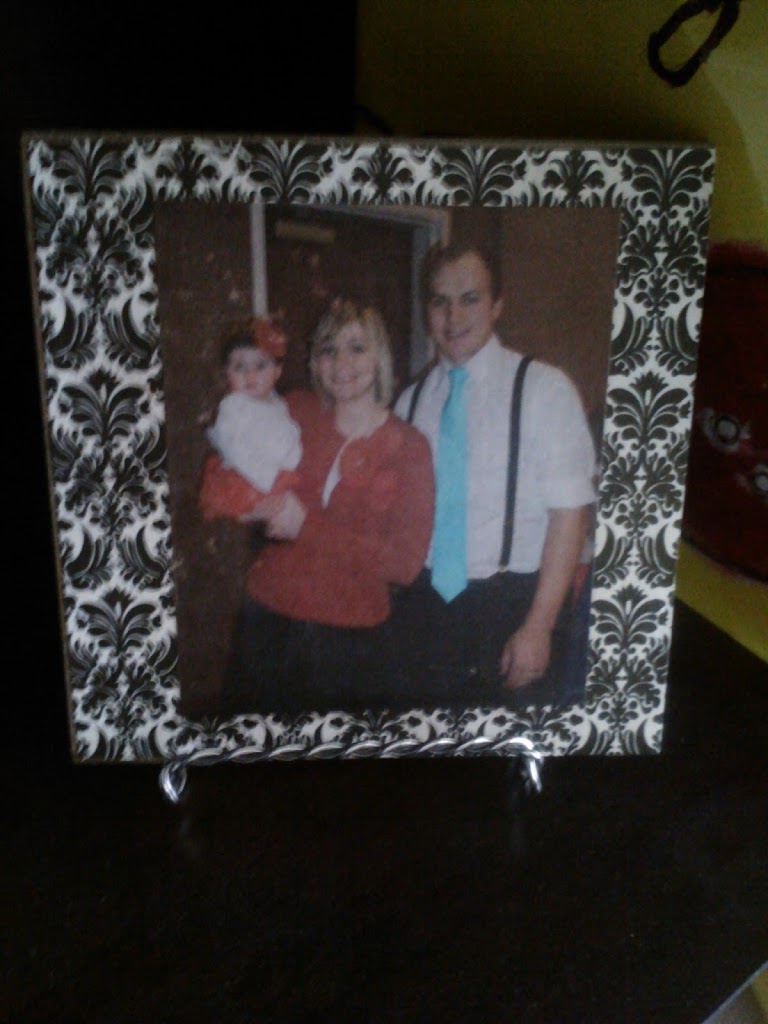
This is one I printed with paper, it didn’t work as well, because of the all the color. But I did do paper with a black and white photo and that one turned out a lot better. So if you use paper, I would suggest only a black and white photo, with not so much detail. If you use card stock and a colored picture it will turn out great.  
I hope this helps you out when your in a bind for a last minute wedding gift, or any gift for that matter! 
Please follow and like us:
Posted on

Tagxedo Word Art!

Have you ever heard of Tagxedo? Let me tell you, I discovered this the other day and I can’t get enough of it! It is just plain awesome. It puts words into an image for you. But it just looks awesome! Click right here to go to Tagxedo. I can’t explain to you how great it is, so let me just show you a picture!

Pretty sweet, right? Yes. 
When I saw this site, I instantly knew what I wanted to give my 8 year old Primary kids for their baptism gift. This is what my Presidency and I are going to give the kids on the Sunday after they are baptized. I think it is a perfect baptism gift! I am so glad I found this site. 
 At first the site seems like you can only have the 25 or so pictures they have to offer. That’s not the case!! Once you get to the site click on Images I believe and scroll to the bottom, you can download an image. So you can pick any image you want and write any words you want in it, and they have tons of color themes, and font themes to choose from. It is a genius website, and it’s FREE! 
For the gift, we just print this image with their name and all the other words in the above picture and change it to their favorite colors. We print it on card stock, and then we just buy an 8×10 frame at the dollar store. It is such a cute, simple, and heart warming, gift. It will help them remember to keep their covenants they made on their baptism day. I love it, don’t you. πŸ™‚

Now, tagxedo is very, very hard to figure out at first. So I decided I would give you all some tips when using it at first.

1. GETTING YOUR DOWNLOADED IMAGE: 
When you start your image will automatically be of the Earth. The words all over it will be Mother, and Earth. To change this click on Shape, it will give you many different options to choose from. To get your own image, scroll to the bottom of the shapes and click on download image. (or something like that) It will then pop your image up you can change the blur and the other option it gives to the best way you like it. Click accept, and it will show you what your image looks like, if it looks bad go back and try to fix it. 
2. THE WORDS:
This took me forever to figure out how to change the words. I had a CTR shield and the words Mother and Earth all over it. After seriously 30 minutes of searching I found where to do it! 
  • Click on “Load”, it is above the Save option. Once you click load, it will have a box to put a url, and a text box. 
  • Use the text box to write whatever words you want. I only had about 5 words on my image, So I just wrote the ones I wanted to be the biggest 2 or 3 times. The more frequent the word, the bigger than the rest of them. 
I hope this saves you time by reading this step, because it was a bugger to find for me!
3. FONT AND COLOR:
This is pretty simple. After the word Font, Theme, etc., it will have a swirl after the words. Don’t click that. It will change everything you just worked on to something random. There will be an arrow after that. Click that, and you can change your font and color (which is the theme). 
Hope these help you out and save you a little bit more time then it did for me! πŸ™‚ 
Please follow and like us:
Posted on

Save money and use a garbage sack for your diaper genie!

Does anyone dread going to the store because you know you have to buy a diaper genie refill and spend a lot of money on something you just throw away? Well I do, and I have come up with a solution on how to not buy them anymore and save money! Plus, it’s soooo easy!!  YAY!! We get 3 loads out of our refills, and a single refill is $5. So, we were pretty much paying $1.75 to hold my babies diapers. If you use a garbage sack instead it will only cost about 10 cents per load of diapers. ( Don’t judge my math, these are all estimates, but you get my drift.) Yeah, I will take that over  $1.75 any day. Here is how!

All you need is:
Any garbage sack
Diaper genie refill that needs to be refilled. Haha. I thought that was funny! If you didn’t get it, it’s just an empty diaper genie refill.

Start out by putting your empty refill upside down. Put your garbage sack in the little slot where the previous one use to be. Do this all the way around it. You’ll have to bunch it a bit because the sack isn’t meant for this, but it works! When you’re all done it should look like number 3 of my pictures.

Keep pushing it through, you’re almost done! 
Done. Finally. Put your hand in the bag and pull out. Your refill should still be upside down.
Keep pulling through….
Done. Now even out your garbage sack and….
VOILA! You’re done! Told you it was easy. 
Save money, live better. That’s my motto. Wait maybe that’s Walmart’s….well it’s mine too! πŸ™‚ I truly hope this makes you, and your babies life easier. 
Please follow and like us:
Posted on

DIY curtains out of bed sheets! No sew!

DIY Curtains!
(only $12.00 or less)
I made my own pleat! Oh yeah!

I’ve been needing curtains in my room forever! We don’t have blinds so we’ve had a blanket over our window. It makes our room soooo dark and creepy, I hated it. Finally, yesterday I got the courage to attempt to make my own curtains because they’re too expensive to buy! I took off that blanket and couldn’t believe my eyes, my room was lit with natural light, it was a wonderful site. πŸ™‚

One of my favorite parts of my project was watching my daughter laugh at me! I was trying to put up a queen sheet of my own to see if that was a good size sheet to buy and use as curtains, and she laughed at how hard I struggled to put that sheet up.

What a little cheese ball!

 Isn’t she the cutest thing ever!?                                        
Supplies:
  • Queen size sheet or fabric. You’ll have to measure your window to see what you need. My window was 76 in. wide.
  • Heat n Bond (ultra hold works the best!) This stuff is amazing!! It’s for us no-sewers. πŸ™‚ I got mine at Walmart in the sewing section.
  • Ribbon
  • Hot glue and glue gun
  • Scissors 
  • Tape measure
  • Iron

How to:

Step 1:
-Start out by measuring your window, as I said earlier. That way you can see what size sheet you need. I happened to need a queen size sheet.
Step 2: 
-Measure your sheet and cut it in half up and down, it doesn’t have to be perfect, but don’t make an awful cut! πŸ™‚ 
-Once it’s cut length wise cut both your curtain halves at the bottom. You’ll need to measure how long you want your curtains to be. If you want them to touch the floor then measure from the curtain rod to the floor. I wanted mine just a little bit shorter and not touching the floor. 
This is just one of my halves. Make sure you do both! 
Step 3: 
-After your curtains are cut, get your amazing Heat n Bond. Now, I have heard of it before, but I never knew it was so magical! This stuff is awesome if you can’t sew! I want to do many sewing projects and use this stuff instead, it’s really awesome! πŸ™‚ 
-Take one curtain half and flip it so the pretty side is down. 
-Take heat n bond and put the sticky/scratchy side down, smooth side up on your upside down fabric.
-Iron the heat n bond onto fabric. (Wait for it to cool about 10-15 seconds! It will burn you if you touch it right after you iron it. I know from experience, unfortunately!)
-Once it’s cooled,  take off the white paper on top.

-Fold over fabric and iron again. This will make it stick and you’ll have a straight edge instead of a scratchy cut one.
It’s not ironed here. I just didn’t take a picture of it ironed. 
-Do these steps to every edge you cut to make it a straight edge. Do it with the other curtain. Once your done it should look like this. 
Step 4:
-Take your ribbon and cut out 14, 2 inch strips. (7 for each curtain) The ribbon is going to hold your curtain up. So you can cut as many that satisfies you and your curtain. 
-Hot glue the ribbon to the back of the curtain. I glued the top, then the bottom. Make sure you can put at least 2 fingers in between your ribbon. Just to make sure you have enough space to put it through the rod.
-Once it’s glued you can cut off the extra ribbon so you don’t have alot of excess ribbon.  Once it’s done it should look like this. 
I would have put the ribbon and the very ends instead of where I put it in this picture. When I hung my curtain it kind of flopped down because nothing was really supporting the ends. But it’s not noticeable, unless you made the curtain. No one will know the difference. πŸ™‚ 
-Glue the rest of the ribbon on and your finished and ready to hang them up! 
They make a good pleat! 

I couldn’t get a great picture because I don’t have blinds. 
I love my DIY cheap bed sheet curtains! It was so worth it and I am glad I don’t sleep in a dungeon
anymore. πŸ™‚ I woke up this morning to the light. It was wonderful site! Have a great day! πŸ˜€ 
Please follow and like us:
Posted on

Homemade wall art, very unique and easy!

I have seriously been needing something on my bedroom wall, it only has a few picture and so I decided to attempt this wall art decor. It turned out cute, but I wish I would have used a painting instead of a picture like I did. It would have turned out much better if it had been a painting I’m sure. The thing I like about this is that anything can be on your picture and it’ll still look awesome, because you can only see bits and pieces of it. Here’s mine. It could of turned out better, but I love the jagged letters, it makes it unique, and that’s what art is, right? πŸ™‚

I couldn’t get a picture without the glare, but it turned out  okay. Definitely not my best DIY project.
What you need:
  • Second hand store painting or picture, mine was only $3.00 (I did picture and I wish I would have done this with a painting instead!
  • Craft paint
  • Vinyl letters
  • Paint brush
  1. Start out by selecting a quote, scripture, saying, name, anything you can think of. Once I know what you want to put on your picture get your vinyl letters and cute them out. Don’t stick them to the painting yet, you will want to get thing organized first. 

I got these at Walmart for $3 in the school supplies area. I will definitely be using these for future projects. Actually my next project involves these as well. Stay tuned, eager one! πŸ™‚  

Here is how it should look like cut out.
    2.   Next stick the letters on the picture. 
I like this picture because it reminded me of Jamaica, where Jon served his misison. πŸ™‚ He told me it wasn’t even close to looking like Jamaica, but I still think it looks like it. 
   3.   Get your craft paint and paint brush and paint the whole picture.

4.   This next step it vital! I really wanted to see what it looked like, but my husband said to do one more coat, so I did, and it was a bad decision. ONLY DO 1 COAT. It will end up looking like this….oh well, I still like it and it give it a feel of real craftsmanship! πŸ˜‰ Don’t tell me differently. Haha.
 
When you’re all done hang it up and smile at your accomplishment! 
Now as I said before, mine is not perfect at all, this for sure wasn’t one of my most proud of DIY projects. But I love it none the less. Having this saying right by my bathroom in my bedroom is a perfect way to remind me of my MANY MANY BLESSINGS! Happy crafting all! πŸ™‚ 

Please follow and like us:
Posted on

DIY Sunburst Mirror with paint sticks! Less than $2!

Yesterday I was roaming on pinterest and saw this and HAD to do it! It looked so fun and pretty easy, better yet it was SUPER cheap and stinkin adorable! This whole project only cost me……wait for it……..$2.14. But that doesn’t even count because I bought 2 bottles of paint. But only used about 3/4 of one bottle. So it cost only $1.57!! Wow? I think so. Go to this link here and see how much they sell something like this at Target. Now it doesn’t look exactly like this, but I think mine is cuter than Targets. You’re saving a lot of money by doing it this way!

To start off your beautiful sunburst mirror you will need the following:

  • Round mirror tile. I bought mine at the dollar store, because I like to save money. The mirror that I got was about 5 inches in diameter. I called Hobby Lobby to see their prices it ranged from $2.99-12.99. They said the $12.99 one was about 12 inches in diameter. The reason I am telling you this is to let you know about how many paint sticks you need to get by going off the size of the mirror. The bigger the mirror, the more sticks.
  • 24 paint sticks for the mirror size I got (5 in.)  (These are usually free) People may wonder why you need so many. Now, let me tell you, the tutorial that I looked at said to use 50!! I went to Walmart and asked the little old man at the paint counter for 50 paint sticks. He looked at me with concern in his little blue eyes, I said it was a craft project I was working on. I even offered to pay for some, I felt like I was robbing Walmart! The little old man went to the paint counter and counted out 50 sticks, I offered to pay again, and he smiled at me and said, this is the only thing in life that’s free. I smiled at his kindness, and told him thank-you. He made my day! πŸ™‚  Sorry for the story. It was just so cute, don’t you think?
  • Wire cutter pliers
  • Paint .57 cents at Walmart.
  • Ruler
  • Hot glue gun/glue sticks
Step1:
To start off you’ll want to take off these black rubber things on the back of your mirror, if yours has them. You’ll probably want to take the sticker off too. I didn’t, and I picked up a paint stick after I had glued it on, and it came off because it was glued only to the white sticker part. Learn from my mistakes.

Step 2:
Take half (12 for me) of your paint sticks and cut them with wire cutters. This is where your ruler comes in, I took my ruler and measured 9 inches. I drew a line and that is were I cut it.  It just so happens that I was able to cut them without measuring again. We cut them right at the end of where the divots are. (Actually my husband cut them, he is so wonderful! I am lucky to have him!)

Bad glare, but it should be understandable.
Step 3: 
Take 6 of the ones you just cut and cut the edges of them like so. We weren’t planning on this, but we tried to lay the sticks one back of the mirror and they didn’t fit. So we cut both edges of the stick, so we could fit them in place. (You may not have to do this step, maybe you can squeeze them all on the back of the mirror without cutting. If you can, GOOD JOB! We couldn’t! πŸ™‚ )
 
This is what it should look like.
Step 4:
-Take all of your paint sticks and paint them. Here is a picture of how I painted, it was super easy just to pour it on like this. 
Also, I don’t know why I didn’t paint the other side with no words, I would of done that now that I think of it. I had to do 2 coats because you could see the words on the first coat. When I painted the 12 sticks I didn’t cut, I painted on the other side with no words, I only had to do one coat! Don’t forget to paint the sides and tops as well. I would also paint both sides, I didn’t and wish I had. 

Step 5:
Once the sticks are dry, lay the 12 ones that you cut on the back of the mirror with the paint side down. This just makes sure that they all fit, and if they don’t, then you can cut the edges off more. We did a pattern with the sticks, and went every other one.  That probably doesn’t make sense, we went–cut edges, straight, cut edges, straight, etc. Hope that makes sense? Look at the picture for better understanding. (See this is why I wish I would have painted both sides, it’s ugly, but nobody see this side, so it’s really not necessary!)

Step 6:
-Once everything is in place start hot gluing the sticks onto the back of the mirror. Try to get the sticks across from each other to be in the exact same spot. Your finished project will look more even.

 Flip it around and you have your first layer of the sunburst done!

A few are closer to each other then I wanted, but you really can’t tell with the finished project because you put other sticks around it. It already pretty and it’s not even done yet!

Step 7:
Flip it back over ( I know you just want to keep it as it is, but it will be even prettier, I promise! ) and start  hot gluing the other 12 sticks that you didn’t cut. Put them in the gaps in between the ones you cut.

 I painted a few of both sides, but I wanted to see the finished project so I rushed through it!

Step 8: (LAST STEP!) πŸ˜€
We were trying to figure of a way to hang it and my husband thought of this, which is brilliant, and a money saver! It’s not too pretty, but no one see the back so who cares!? Not me. πŸ™‚ We took a piece from one of the paint sticks we cut and hot glued the ends of the paint sticks on the back and then just hung it with a push pin.

Once you’ve labored so hard to get your beautiful sunburst mirror for less than $2.00 you can see your finished project, and LOOK how beautiful it is!! I love it. 

It goes great in between my picture of Christ and of the Oquirrh Mountain Temple, where we were sealed! 

I think everyone that comes into my house will make a comment on how beautiful it is. And remember it only cost me under $2.00. Ohhhhhhh Yeahhhh Boyyyy! πŸ™‚
Please follow and like us:
Posted on

Chair re-upholster and paint redo!

We’ve needed new kitchen chairs for a while now. The ones we had were like 70’s chairs, and not so pretty. But they did get the job done for sitting, and worked great for our first years of marriage! It was time for change so I ventured off to the D.I. (local second hand store in my area) in search of 4 CLEAN, nice looking chairs. I did indeed find 4 chairs in pretty great condition, so I picked them up for $15 a chair. My whole intent on buying them is so I could redo them into something pretty, really really pretty! 

Not too bad, right? But they definitely needed some beautifying!
The next day I went out to search for fabric to redo and found the one calling my name saying, Kenzie, Kenzie,  buy me, buy me!  I bought it and every time I see it I smile, see for yourself! Pretty, isn’t it?!

After I got my fabric it was time to get paint and other supplies to get the job done. I chose a pretty blue that matched perfectly with the flowers on my fabric. All in all my chairs are beautiful, and super easy. It is time consuming, but well worth it once you get the finished project! Here is the tutorial how I did it!
CHAIR REDO TUTORIAL!  (PAINT AND RE-UPHOLSTERED)
Supplies:
Fabric (3 yards worked for me, but you may want to measure yours)
Paint that matches fabric, preferably! (I got a quart of semi gloss, with left over to do touch-ups we missed)
Paint brushes
Sand paper (we got  180 grit)
Sanding block (if you have lots of detail like mine)
Staple gun and staples
Screwdriver
We did this whole project outside, it was a kick off to a wonderful spring that we’re hoping to have! πŸ™‚

How to:

    1.  Removal:
             You need to start off by taking the seat cushions out, with a screwdriver.
    2.       Sanding:
My husband and I used team work, so he sanded, because I had no idea how to do that, while I re-upholstered the chairs. Just him sanding took about an hour, this project will take all day with the drying and painting and other things. You could try an electric sander, but it may sand down too much of the chair. He sanded down leaving just a tiny bit of finish on some of the chairs. He just sanded more over the divots of the chair, if there were no divots, he’d briefly sand over the chair. Use your best judgment on this part.
     3.       Re-upholstering:
I used 3 yards of fabric for four chairs, with quite a bit left over. I didn’t even measure when I cut my fabric out. I laid my fabric with the print side down on the table. Then I got my seat cushion and put that on top of the fabric with the padded side down first. I cut about and extra 2-3 inches on each side so I could fold over the material onto the back of the seat cushion. Once its cut, cut out the other four using the one you just cut out.

Once all pieces of material are cut, get a piece of fabric you just cut out and put it print side down. Get a seat cushion and put the padded side down on top of the fabric.

     4.    Stapling:
Get the staple gun and fold the fabric over as far as it reaches and staple the top 3 times then the bottom 3 times.  (By doing this it secures the fabric to the seat cushion just enough to hold it in place, but if you make a mistake and there is lots of material bunched up on the front of the seat cushion you just have to undo 3 staples instead of 15!) Then get the corners of the fabric and fold over and staple. Staple the rest of the fabric, checking every now and then on the other side to make sure none of the fabric is bunched up. Then go staple crazy and staple all the fabric of every side down securely (about 15-20 staples on each side.) Repeat this with other chairs. It should only take 5 minutes at the most to re-upholster one seat cushion.
     5.    Painting:
Once the sanding and seat cushions are done you can finally paint them that wonderful color you’ve been dreaming about for weeks! We did 2 coats of paint and it was sufficient enough. The paint we got recommended 2-3 hours before you put on the next coat, but we only waited an hour because it was sunny and windy out. 

This is our finished project and we couldn’t of been more pleased of the outcome! Do this yourself and you’ll have people asking where you bought your cute chairs. You can proudly tell them you did it by yourself, they’ll be amazed and want to do the same thing! ENJOY! 
Please follow and like us: